PSP Modding is alive and well with emulators like PPSSPP and RetroArch, but today we are going to focus on how to install HD and Custom texture packs on the PPSSPP emulator. There are a couple of places where you can find a variety of HD Textures for your favorite PSP games. I would recommend GBATemp Forums and the PPSSPP forums.
If you are looking for a Classic Handheld console that supports multiple emulators, including PSP, we recommend checking out Anbernic’s offerings on their devices.
How to Install HD Textures on PC
The process of installing HD Textures is roughly the same regarding the device, but when it comes to using this on Android or possibly on Retro consoles with emulator support, the directory might be slightly different, but the whole process will be mostly the same.
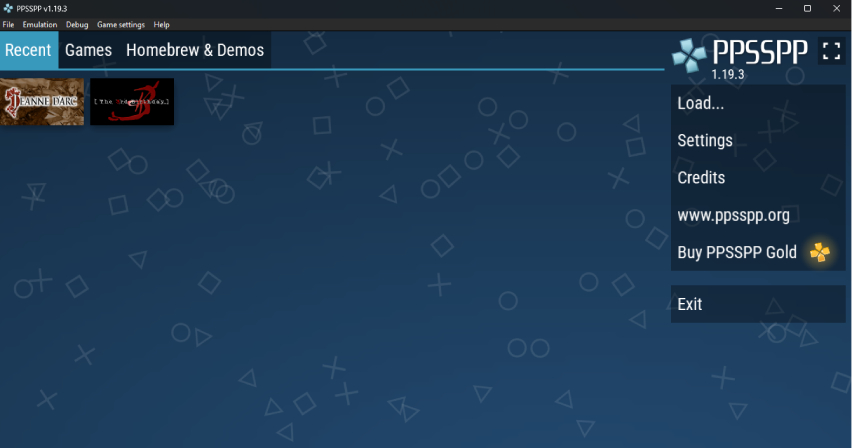
- 1) First step is to download the latest version of PPSSPP. Note that they do have a paid version as an alternative, but I haven’t seen anything regarding HD Texture packs that are behind a paywall as of right now.
- 2) Then acquire the actual game that you want to use a Texture pack for, and make sure to pay attention to the game version, so for example, for “The 3rd Birthday” USA version is called ULUS10567, or Jeanne D’Arc has version name UCUS98700, and you can find all version numbers from SerialStation.
- 3) Next up, we need the actual texture pack, and these are often in .zip file format that can be opened with either WinRAR or 7zip, but we don’t want to open the file. What we want to do is drag the folder onto the screen. The PPSSPP will ask you to “Install textures from ZIP File?” and choose install – this will lead to two scenarios. If everything goes correctly, it will start installing the pack, and this will take half a minute.
- 3B) Or the emulator will tell you that this zip file cannot be installed, which means we have to do it manually. Proceed to unzipping the files and then finding the default folder, which should be this path C:\Users\Putachi\Documents\PPSSPP\PSP\TEXTURES, and here you can create a folder which is named after the game, i.e., ULUS10567, and drop all the files from the texture pack there.
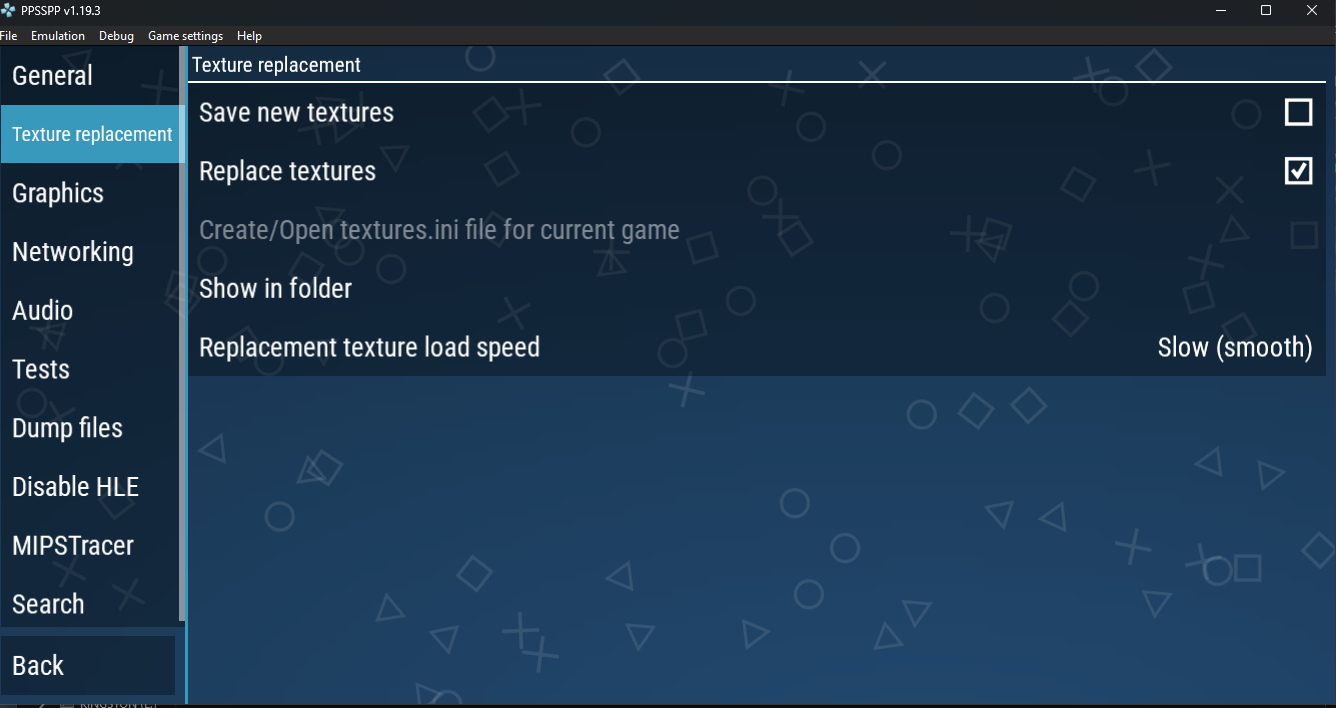
- 4) Then we make sure that you have custom textures enabled by default. Open Game Settings > More Settings > Tools > Developers > Texture Replacement and make sure to toggle “Replace Textures” on so the game will automatically allow custom HD texture packs. Optionally, if you witness any loading issues, you can change the Texture load speed and also toggle “save new textures” if you want.
- 5) Optionally, you can go to Game Settings > More Settings > Graphics and make sure Rendering resolution is higher. Depending on how dated your computer is, you can easily run this at 4x or 8x, which would be equivalent to 4K resolution. Scroll down again on graphics until you see the Texture upscaling category, and under that is “Upscale Level.” This probably should be toggled off when using texture packs.
- 6) Finally, go back to the main screen and proceed to run the game. If everything went as it was supposed to, there would be a green text at the top saying “Texture Replacement pack activated,” meaning the texture pack is now working.
How to Install PSP HD Texture Packs on Android
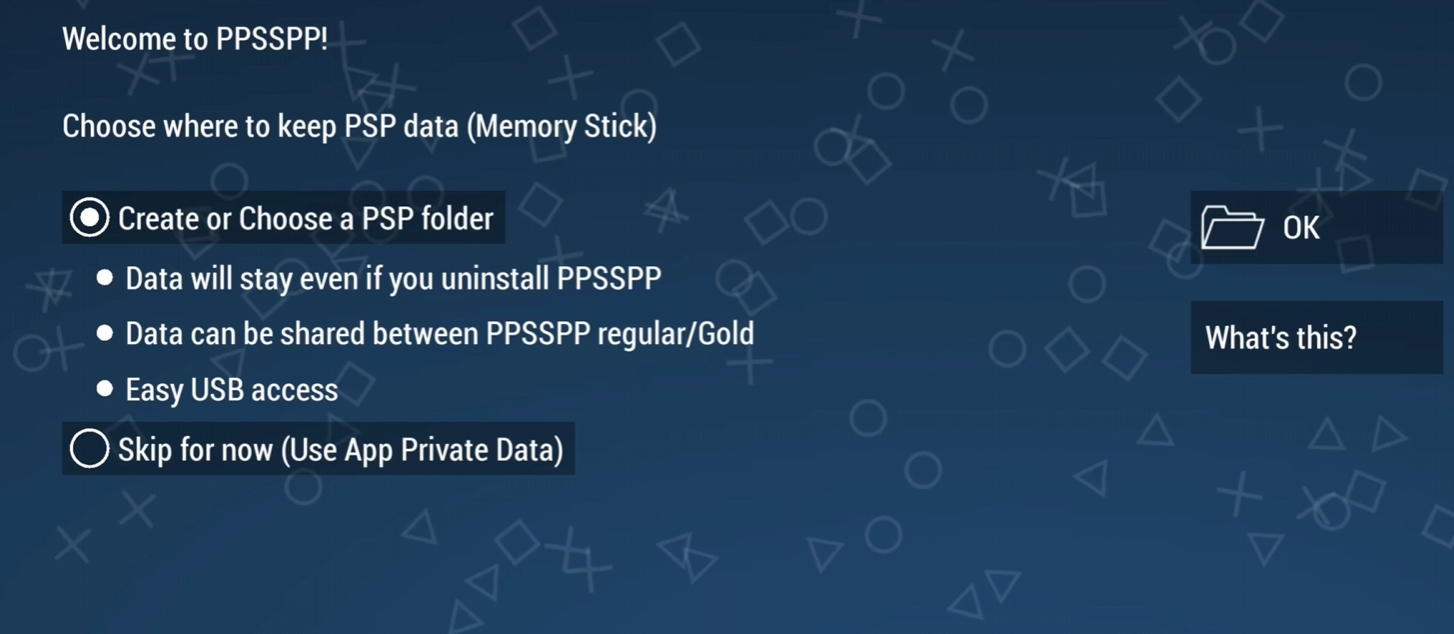
Now, when it comes to Android versions, the best course of action during installation is to go with the option above, which creates a PSP Folder inside your device, whether that is your phone or perhaps a Retro Handheld Device. Choosing the option below “Use App Private Data” will require you to access it with your PC, which is just an overall annoying hassle. If you accidentally chose the one below, you can revert this decision by going into Settings > System > PSP Memory Stick and choosing the Memory Stick folder, and choosing to create a new PSP folder.
- First, download the texture pack and proceed to find the folder (Assuming the downloads folder) and proceed to extract it. Once again, find the game ID folder under the texture pack if that doesn’t exist, create one.
- Then, proceed to copy that file and go into the PSP folder in your Android device, and under it, there should be a TEXTURES folder where we need to have a folder with Game ID like ULES-00850 and place all the textures under that folder.
- Finally, we are going back to the main PPSSPP screen and going into settings and toggling “Replace Textures” like we did on the PC version above.
- Now start the game, and a green notification should show with the text “Texture replacement pack activated” if everything went as it should.
So basically, doing this same thing on Android is a pretty much identical process. If there is something unclear about this process or texture packs in general, please leave a comment and I will try to help best of my ability.